Table of contents
Context
In the last article in this series, I went over what is a game jam, and our team's game idea of a bunny character that must protect its home. We already had some UI mockups, art assets, and some basic scripts for the character movement:

We left off with the creation of the 1st enemy prefab, the enemy beetle:

And now, let's continue our development story.
Day 3 - Feb. 1st
Enemy Beetles!
I continued working on the beetle behavior! For the enemy movement, I wanted to use an old AI technique called steering behaviors, proposed by Craig W. Reynolds:
Steering behaviors aim to help autonomous characters move in a realistic manner, by using simple forces that are combined to produce life-like, improvisational navigation around the characters' environment.
They are not based on complex strategies involving path planning or global calculations, but instead use local information, such as neighbors' forces. This makes them simple to understand and implement, but still able to produce very complex movement patterns.

Again, It was very cool to see that ChatGPT also help me out with this script. But then, a new task suddenly emerged.
⚠ Note: As a heads up, in the end, I couldn't implement these behaviors in our project. I wanted to at least show another instance where this AI content creation tool was useful.
1st Github Lesson!
One of the main benefits of participating in a game Jam is that participants get to learn something new, and this game jam project was no exception. One of our teammates had never used any Version Control software before, and our team decided to use GitHub, so one of my tasks ended up being teaching the very basics of version control systems, and how to use GitHub to commit changes and push them to the remote repository.

We went over the differences between using a simple solution like Google Drive versus using a repository, and this included the differences between a local repository and a remote repository. In the end, it helped to teach about how is it that these version control solutions help teammates collaborate toward a shared project.

And in the end, our teammate was able to make their 1st commit and push to a GitHub repository ever!
Enemy Beetles! - Continued
How can an enemy take damage?
After that quick Github lesson was done, and even though I was extremely excited to test and see if the steering behaviors from before would work, I knew that I needed to concentrate on more fundamental tasks to make sure that the gameplay is functional. I decided to add the necessary code and prefab modifications to The Beatles so that they could interact with the bunny character attack collider.
I first created this simple interface, so that classes or structs that implement this interface must define their version of a TakeDamage function:
public interface IDamageable
{
    public void TakeDamage(int damage = 1);
}
Interfaces are not the same as a base or abstract class, it's like a contract or obligation given to the object that decides to implement that interface.
For more information, please refer to Microsoft's documentation:
Changing some physics settings
Game engines let you modify some physics settings on the world, and also on the game objects that are interacting or are part of the world, and Unity is no exception. This is what we're going to do with our enemy beetle. we're going to make the physics system treat the enemy beetle a little bit differently, in terms of what physics layer the enemy Beetle belongs to.
I created a new layer called Beetle Enemy :

I did a similar addition to the bunny's hammer hit box object, I created a new Physics layer called HammerHitCollider:

With these two new layers created, I can now go to the general physics settings of the project and enable or disable collisions from specific physics layers. I changed it so that the Beetle Enemy and the HammerHitCollider layers only interact or collide with each other, and no other physics layers:

This is good because now we don't have to worry about taking care of every possible collision that can occur between beetles and other kinds of objects, like for example, the floor!
For more information, please check out Unity's documentation on physics layers:
Script changes to react to physics events!
Now that we've modified the physics settings of the project, the enemy beetle, and the main bunny character, let's go ahead and add the necessary changes in code so that they can react to the events sent by the engine’s physics system.
Let's add this EnemyBeetleDamageController class so that the enemy knows what to do when it collides with "something". That "something", we guaranteed that it will be the bunny's attack collider:
using UnityEngine;

public class EnemyBeetleDamageController : MonoBehaviour, IDamageable
{
    [SerializeField]
    [Min(1)]
    private int m_hitPoints = 1;

    public void TakeDamage(int damage)
    {
        m_hitPoints -= damage;

        gameObject.SetActive(false);
        Destroy(gameObject);
    }

    private void OnCollisionEnter(Collision collision)
    {
        // no need to check collisions because enemy beetles
        // only collide with bunny hammer
        if(collision.collider.enabled)
            TakeDamage(1);
    }
}
Note: I added the
IDamageableinterface to this class, so it must implement the TakeDamage function
And finally, we need to add a simple change to the BunnyHammer script which is just enabling and disabling the hit collider when we need to:
using Unity.VisualScripting;
using UnityEngine;

public class BunnyHammer : MonoBehaviour
{
    ...

    [SerializeField]
    private Collider m_hammerHitCollider;

    void Update()
    {
        if (m_canAttack && UserWantsToAttack())
        {
            ...

            m_hammerHitCollider.enabled = true;

            ...
        }

        else if (!m_canAttack)
        {
            m_hammerHitCollider.enabled = false;

            ...
        }
    }

    ...
}
And finally, we have the first actual bunny "attack"!
Nothing fancy is currently happening, but we have an actual interaction between what would be the bunny hit attack and the enemy beetle:

Day 4 - Feb. 2nd
So in our game, we want some variety in the look & feel of the enemies that we want to spawn, so we created these quickly modified prefabs of the enemy beetle:

Spawning many enemies!
Whether we liked it or not, we were headed toward making a tower defense style of game. Now we need to design a way that lets us spawn many enemy beetles. These kinds of games have the concept of enemy waves that come in to attack the home base, or what would be the "tower".
Let's step away from the computer for a while, and think about the design of this. I quickly drew this diagram in my notebook:

I quickly thought of this concept of organizing waves linearly:
Time and Enemy pair - an actual pair of values that consists of the time it takes to spawn an enemy, and then the actual enemy that will be spawned
Enemy Wave - The list of Time and Enemy pairs that will be used to spawn enemies.
This is a perfect opportunity for one of my favorite Unity features, Scriptable Objects!
From the Unity documentation link:
A
ScriptableObjectis a data container that you can use to save large amounts of data, independent of class instances.
We'll later see the main benefit of using this feature in our project. But for now, let's define our Time and Enemy pair in code:
using System;
using UnityEngine;

[Serializable]
public struct TimeBeetleEnemyPair
{
    [Range(0f, 10f)]
    public float m_timeToWaitBeforeSpawning;

    public GameObject m_enemyBeetleToSpawn;
}
A very simple struct with no functions needed as it's just data.
And then an Enemy Wave is composed of a list of these pairs:
using System.Collections.Generic;
using UnityEngine;

[CreateAssetMenu(
    fileName = "BeetleEnemyWaveData",
    menuName = "GGJ_2023/BeetleEnemyWave", order = 1)]
[Serializable]
public class BeetleEnemyWave : ScriptableObject
{
    public List<TimeBeetleEnemyPair> m_timeBeetleEnemyPairs;
}
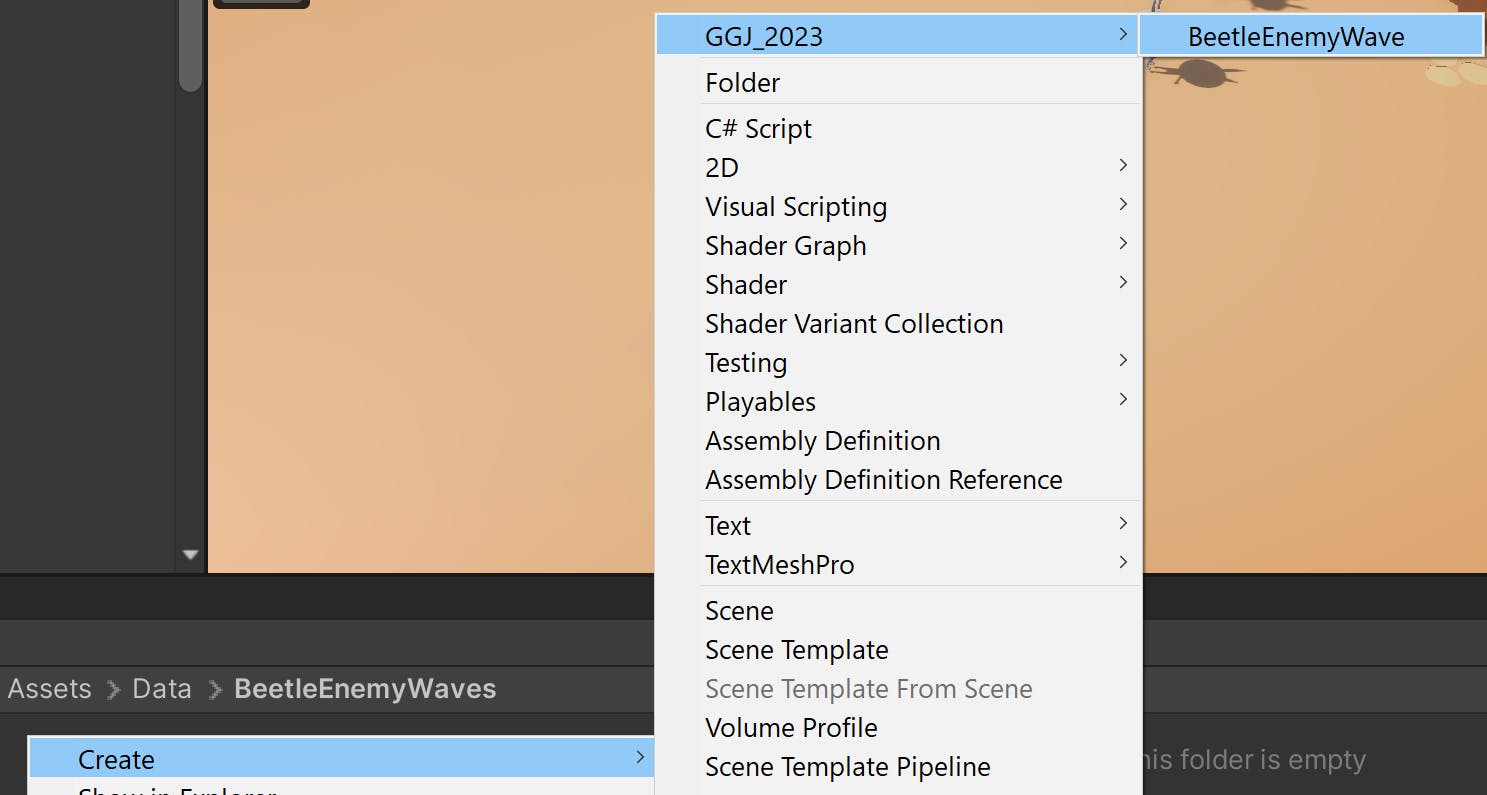
Please notice that a BeetleEnemyWave inherits from the ScriptableObject class. Now notice the [CreateAssetMenu(...)] attribute that's on top of the class declaration. This attribute gives the ability to create a type of that asset through the right-click menu:

Day 4... to be continued. We'll look at what the created asset looks like! 👀
Indeed, a lot was done in these two days! But still, 3 more days to go, and I'll continue this development story in the next post! 😄
Lessons learned
Making a tower defense is clearly not an easy genre to make during a game jam!
It's not the best when you're the only programmer on your team, but creating "tools", or usable components that can be used by your teammates will help!
Re-learned that you must time and time again solidify gameplay first. I believe that we headed too fast toward defining the art style.
Please let me know what you think!
What do you think of the project so far?
What would you have done differently to build this idea out?
Have you used scriptable objects before?
🎉🎉🎉 Happy building! 🎉🎉🎉
